How not to mess up with AtomicReference and autoboxing

One day I found myself writing something suspiciously similar to AtomicInteger#incrementAndGet. Here’s a simplified example of what it looked like:

class SlightlyAtomicInteger {
    private final AtomicReference<Integer> reference = new AtomicReference<>(0);

    public int incrementAndGet() {
        while (true) {
            Integer oldValue = reference.get();
            Integer newValue = oldValue + 1;
            if (reference.compareAndSet(oldValue, newValue)) {
                return newValue;
            }
        }
    }
}

IDE inspection told me: “Psst, you can change newValue declaration to int”.
I thought: “Why not? Oh, and I’ll change oldValue to int too”.
As you may have guessed from the title, I shouldn’t have done that.

I ran a test which increments my SlightlyAtomicInteger many times, and it hanged. The test was multithreaded and had an ExecutorService, a CountDownLatch and other things which kind of distracted me, so I wasted some time trying to understand where exactly I messed up. Then I added a debug print statement for the newValue, ran the test again and saw the program’s last words:

...
126
127
128

Smells like an Integer cache! I changed oldValue declaration back to Integer and the problem was gone. Let’s take a look at the javadoc for AtomicReference#compareAndSet to see why it was happening:

Atomically sets the value to the given updated value if the current value == the expected value.

compareAndSwap works with objects and checks only reference equality. Autoboxing is done via Integer#valueOf, which caches values from -128 to 127 and returns the same references for them. But for other values, repeated boxing will return two different instances:

Iteration current value expected current value new value
N-1 126 from cache 126 from cache 127 from cache
N 127 from cache 127 from cache some instance of 128
N+1 some instance of 128 another instance of 128 some instance of 129

Starting with 128, references to “current” and “expected current” values stop matching at all. In other words, If I initialized my class with any number >= 128 instead of 0, then it would hang immediately on the first iteration.

Usually people advise to use primitives by default, unless you need a nullable value or something to put in a collection. This rule can be expanded to any class with generics, not just collections, as it turned out with AtomicReference.

Making Jekyll + LiveReload work on Windows

Once upon a time I was feeling adventurous and offered a fellow developer to migrate his website from a bunch of hand-written HTML pages to Jekyll. He’s a Windows user, so I had to make sure that writing, previewing and building will work there with minimal effort.

I encountered a couple of problems during the process, so I decided to document it step by step for future reference.

Install Ruby + Devkit

RubyInstaller is a project that makes working with Ruby on Windows less painful. For this post I used Ruby+Devkit 2.4.4-2 (x64) — the recommended version which was highlighted in bold on the page.

The GUI part of the installation is pretty straightforward, all parameters set to default values. After that, a command-line installer appears.

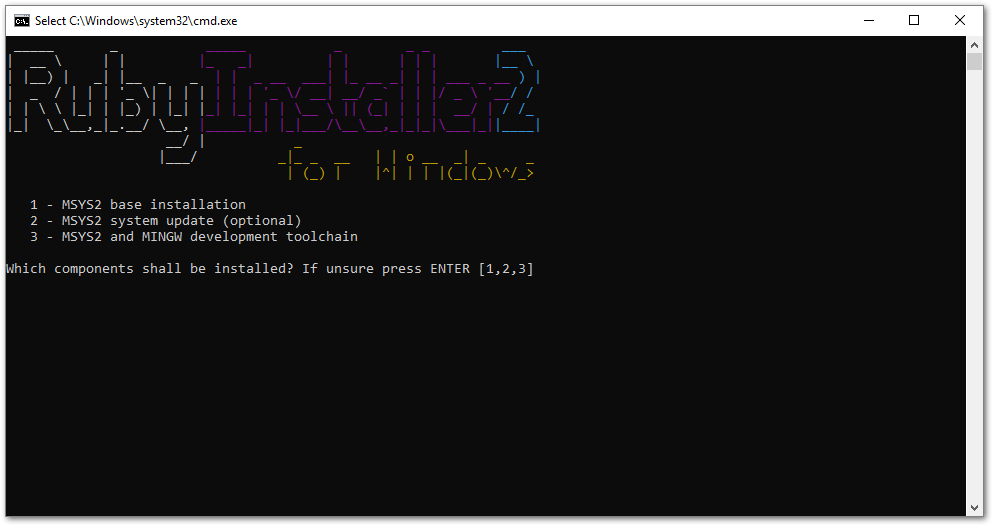
Here I had some trouble: it looked like 1,2,3 is a preselected option, but simply pressing ENTER didn’t do anything. I had to manually type 1,2,3 and then press ENTER.

If you wonder what these three options mean, I found this answer pretty clear.

The process takes some time and finishes with a similar screen, but the preselected option is now empty because all three components are already installed:

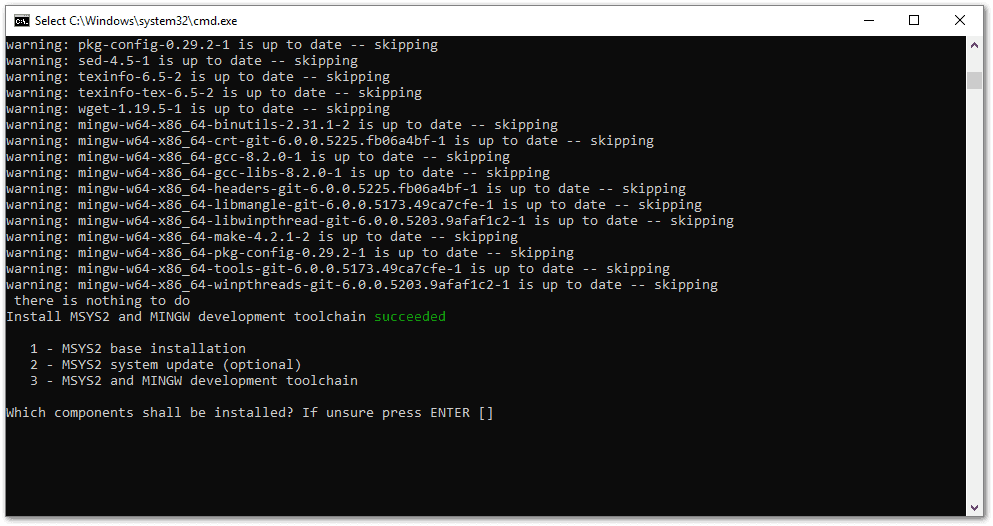
One more trouble here — I had to press ENTER two or three times for the window to go away.

Install Jekyll

For the remaining steps I used Git bash, but Windows command prompt is also fine.

First, let’s check that Ruby is working.

$ ruby -v
ruby 2.4.4p296 (2018-03-28 revision 63013) [x64-mingw32]

Install gems as written in official Jekyll on Windows guide. For some reason I had no console output when the operation was in progress, it all appeared at the end — so don’t worry if you don’t see anything for a couple of minutes.

Note that some lines from the output are omitted and replaced with ...

$ gem install jekyll bundler
Successfully installed public_suffix-3.0.3
Successfully installed addressable-2.5.2
...
Done installing documentation for bundler after 11 seconds
26 gems installed

No errors so far. Let’s create a new Jekyll project called foo:

$ jekyll new foo
Running bundle install in C:/Users/User/foo...
  Bundler: Fetching gem metadata from https://rubygems.org/............
  Bundler: Fetching gem metadata from https://rubygems.org/..
  Bundler: Resolving dependencies...
  ...
  Bundler: Bundle complete! 5 Gemfile dependencies, 33 gems now installed.
  Bundler: Use `bundle info [gemname]` to see where a bundled gem is installed.
New jekyll site installed in C:/Users/User/foo.

Also no errors. However, there is one more important step…

Fix LiveReload

I’ve read about some LiveReload problems on Windows before, but this one caught me off guard:

$ cd foo

$ jekyll serve --livereload
Configuration file: C:/Users/User/foo/_config.yml
            Source: C:/Users/User/foo
       Destination: C:/Users/User/foo/_site
 Incremental build: disabled. Enable with --incremental
      Generating...
       Jekyll Feed: Generating feed for posts
                    done in 0.49 seconds.
 Auto-regeneration: enabled for 'C:/Users/User/foo'
Unable to load the EventMachine C extension; To use the pure-ruby reactor, require 'em/pure_ruby'
C:/Ruby24-x64/lib/ruby/gems/2.4.0/gems/eventmachine-1.2.7-x64-mingw32/lib/rubyeventmachine.rb:2:in `require': cannot load such file -- 2.4/rubyeventmachine (LoadError)
...

A quick Google search revealed that eventmachine gem can be reinstalled with --platform=ruby.

Doesn’t sound like rocket science. Let’s try it:

$ gem uninstall eventmachine
ERROR:  While executing gem ... (Gem::DependencyRemovalException)
    Uninstallation aborted due to dependent gem(s)

Come on, I simply want to reinstall one gem! Java dependency management spoiled me too much. But wait, they should have this parameter…

$ gem uninstall eventmachine --force
Successfully uninstalled eventmachine-1.2.7-x64-mingw32

Now better install the good version before anyone notices.

$ gem install eventmachine --platform ruby
Temporarily enhancing PATH for MSYS/MINGW...
Building native extensions.  This could take a while...
Successfully installed eventmachine-1.2.7
Parsing documentation for eventmachine-1.2.7
Installing ri documentation for eventmachine-1.2.7
Done installing documentation for eventmachine after 5 seconds
1 gem installed

And the final attempt:

$ jekyll serve --livereload
Configuration file: C:/Users/User/foo/_config.yml
            Source: C:/Users/User/foo
       Destination: C:/Users/User/foo/_site
 Incremental build: disabled. Enable with --incremental
      Generating...
       Jekyll Feed: Generating feed for posts
                    done in 0.371 seconds.
 Auto-regeneration: enabled for 'C:/Users/User/foo'
LiveReload address: http://127.0.0.1:35729
    Server address: http://127.0.0.1:4000/
  Server running... press ctrl-c to stop.

Now the website owner can proudly update and rebuild everything on his own, enjoying Jekyll developer features even on Windows.

Update from 2020: I’ve got an email from a reader (thanks Jacob!) that LiveReload doesn’t work if there is no <head> tag in the document, so this also may be helpful for someone. Relevant GitHub discussion

Sound generators and happy little accidents

Writing generators of all kinds is fun. Even if the generator is not randomized, you still have many parameters to tweak — and many unexpected outcomes.

Once I needed to generate WAV files with dummy content and certain bitrate and duration.
The StackOverflow example by Joshua Beckford turned out to be the closest to what I needed.

I played around with the frequencies and accidentally created a bunch of something resembling obscure electronic music. Here are six hand-picked “tracks”, named with the help of colleagues. Listen at your own risk.

01 – Intro

02 – Afraid To Dial A Number

03 – Tickling A Space Hamster

04 – Malfunctioning Zipper

05 – Enraged Chihuahua

06 – Rainy Vacuuming

For the actual usage we went with “Malfunctioning Zipper”. It doesn’t differ much from the original version, mostly deals with one frequency instead of two, but anyway — here’s its source, as a single executable class. If you have IntelliJ IDEA open, but don’t want to mess with new project, simply paste it into a Java scratch file (Ctrl-Alt-Shift-Insert) and run.

import java.io.ByteArrayInputStream;
import java.io.ByteArrayOutputStream;
import java.io.IOException;
import java.nio.file.Files;
import java.nio.file.Paths;
import javax.sound.sampled.AudioFileFormat;
import javax.sound.sampled.AudioFormat;
import javax.sound.sampled.AudioInputStream;
import javax.sound.sampled.AudioSystem;

// sound generation magic taken from https://stackoverflow.com/a/28934588/2807168
class WavGenerator {

    public static void main(String[] args) throws IOException {
        byte[] bytes = generate();
        // places generated file in your project root
        Files.write(Paths.get("./generated.wav"), bytes);
    }

    public static byte[] generate() throws IOException {
        double seconds = 5;

        // try tweaking these three values
        double sampleRate = 44100.0;
        double frequency = 3;
        double scaleFactor = 32767.0;

        double piF = Math.PI * frequency;

        float[] buffer = new float[(int) (seconds * sampleRate)];
        for (int sample = 0; sample < buffer.length; sample++) {
            double time = sample / sampleRate;
            buffer[sample] = (float) (Math.cos(piF * time));
        }

        final byte[] byteBuffer = new byte[buffer.length * 2];
        int bufferIndex = 0;
        for (int i = 0; i < byteBuffer.length; i++) {
            final int x = (int) (buffer[bufferIndex++] * scaleFactor);
            byteBuffer[i] = (byte) x;
            i++;
            byteBuffer[i] = (byte) (x >>> 8);
        }

        AudioFormat format = getAudioFormat((float) sampleRate);
        ByteArrayInputStream bais = new ByteArrayInputStream(byteBuffer);
        AudioInputStream ais = new AudioInputStream(bais, format, buffer.length);

        ByteArrayOutputStream baos = new ByteArrayOutputStream();

        AudioSystem.write(ais, AudioFileFormat.Type.WAVE, baos);

        ais.close();

        return baos.toByteArray();
    }

    private static AudioFormat getAudioFormat(float sampleRate) {
        int bits = 8;
        int channels = 1;
        boolean signed = true;
        boolean bigEndian = false;
        return new AudioFormat(sampleRate, bits, channels, signed, bigEndian);
    }
}

Debugging flaky tests in Intellij IDEA

If an old unit test suddenly fails on your machine and you forget to do something about it, it can be a long time before you meet again.

Probably the name of the test contains exciting words like Concurrent, Sleep or Async. Probably the author of the code resigned a couple of years ago. Anyway, you want to be sure that this test won’t fail again at the worst possible time.

I’ll show a couple of IntelliJ IDEA features which usually help me to catch and fix such stuff.

Retry test until failure

I couldn’t think of a good made-up example, so let’s just write a crappy test which fails in about 5% of cases:

package com.example;

import org.junit.Test;
import java.util.concurrent.ThreadLocalRandom;
import static org.junit.Assert.assertTrue;

public class UnstableTest {
    @Test
    public void willFailOccasionally() {
        double value = ThreadLocalRandom.current().nextDouble();
        assertTrue(value > 0.05);
    }
}

If we run it once, there’s a good chance that it will pass.

Let’s edit a Run Configuration for this test (Alt+Shift+F10).

Set “Repeat” to “Until Failure”:

Launch the test again.

Now we have a proof that the test really fails. We can also inspect the data during the failing iteration if necessary.

Set breakpoint on specific exception

Open the Breakpoints window (Ctrl+Shift+F8) and add new Java Exception Breakpoint. According to the previous screenshot, we need a breakpoint on AssertionError. No additional settings are necessary, just make sure that our custom breakpoint is checked on the left panel.

After this, running the test in debug mode will make it stop on the exception. Now we can jump to any stack frame and inspect the data.