Just a quick heads-up (mostly for future me): if your freshly installed Leiningen complains about permissions, there’s a
good chance that either the installer or lein itself simply didn’t create the .lein directory at the right time.
My setup was:
- install SDKMAN
sdk install javasdk install lein (2.12.0 in my case)lein repl- observe the following:
java.io.IOException: Permission denied. Please check your access rights for /home/user/.lein/repl-port
 at leiningen.repl$repl.invokeStatic (repl.clj:460)
    leiningen.repl$repl.doInvoke (repl.clj:372)
    ...
Create the missing directory and have fun with your REPL (I certainly did with mine!):
user@host ~> mkdir ~/.lein
user@host ~> lein repl
nREPL server started on port 37731 on host 127.0.0.1 - nrepl://127.0.0.1:37731
REPL-y 0.5.1, nREPL 1.3.0
Clojure 1.12.2
OpenJDK 64-Bit Server VM 25.0.1+8-LTS
    Docs: (doc function-name-here)
          (find-doc "part-of-name-here")
  Source: (source function-name-here)
 Javadoc: (javadoc java-object-or-class-here)
    Exit: Control+D or (exit) or (quit)
 Results: Stored in vars *1, *2, *3, an exception in *e

user=>
Today I ran into a mildly annoying issue with Sentry for JVM and found it surprisingly hard to find a proper solution.
Let’s say you have a backend Java/Kotlin service which uses Sentry SDK (mine had both Sentry SDK and SentryAppender
for Logback, but it doesn’t seem to make any difference).
If the service crashes on startup, the error is reported to Sentry as expected but is not printed to stderr anymore.
Normally this isn’t an issue, but it can become annoying when you’re just launching things from your IDE. I imagine no
one wants to go to the web UI just to learn that your local Redis port was set to a wrong number.
The reason it happens is that Sentry registers its own handler via Thread#setDefaultUncaughtExceptionHandler
(controlled by the configuration option isEnableUncaughtExceptionHandler which is true by default). When I was
researching the stacktrace issue, some sources described how to write a custom wrapper around Sentry’s handler (which
already looked like overkill); others suggested turning off isEnableUncaughtExceptionHandler altogether.
Turns out there’s a simpler way — just set the isPrintUncaughtStackTrace option to true and that’s it.
Sentry.init { options ->
    options.dsn = ...
    ...
    options.isPrintUncaughtStackTrace = true
}
Console output example with isPrintUncaughtStackTrace = false (default):
20:42:49.738 [main] INFO  com.example.Application -- Initializing Redis connection for whatever reason

Process finished with exit code 1
Console output example with isPrintUncaughtStackTrace = true:
20:42:49.738 [main] INFO  com.example.Application -- Initializing Redis connection for whatever reason
Exception in thread "main" redis.clients.jedis.exceptions.JedisConnectionException: Could not get a resource from the pool
	...
Caused by: redis.clients.jedis.exceptions.JedisConnectionException: Failed connecting to localhost:111
	...
Caused by: java.net.ConnectException: Connection refused
	...

Process finished with exit code 1
One day I found myself writing something suspiciously similar to AtomicInteger#incrementAndGet. Here’s a simplified
example of what it looked like:
class SlightlyAtomicInteger {
    private final AtomicReference<Integer> reference = new AtomicReference<>(0);

    public int incrementAndGet() {
        while (true) {
            Integer oldValue = reference.get();
            Integer newValue = oldValue + 1;
            if (reference.compareAndSet(oldValue, newValue)) {
                return newValue;
            }
        }
    }
}
IDE inspection told me: “Psst, you can change newValue declaration to int”.
I thought: “Why not? Oh, and I’ll change oldValue to int too”.
As you may have guessed from the title, I shouldn’t have done that.
I ran a test which increments my SlightlyAtomicInteger many times, and it hanged. The test was multithreaded and had
an ExecutorService, a CountDownLatch and other things which kind of distracted me, so I wasted some time trying to
understand where exactly I messed up. Then I added a debug print statement for the newValue, ran the test again and
saw the program’s last words:
...
126
127
128
Smells like an Integer cache! I changed oldValue declaration back to Integer and the problem was gone.
Let’s take a look at the javadoc for AtomicReference#compareAndSet to see why it was happening:
Atomically sets the value to the given updated value if the current value == the expected value.
compareAndSwap works with objects and checks only reference equality. Autoboxing is done via
Integer#valueOf, which caches values from -128 to
127 and returns the same references for them. But for other values, repeated boxing will return two different instances:
| Iteration | current value | expected current value | new value |
|---|
| N-1 | 126 from cache | 126 from cache | 127 from cache |
| N | 127 from cache | 127 from cache | some instance of 128 |
| N+1 | some instance of 128 | another instance of 128 | some instance of 129 |
Starting with 128, references to “current” and “expected current” values stop matching at all. In other words, If I
initialized my class with any number >= 128 instead of 0, then it would hang immediately on the first iteration.
Slay the Spire is a great roguelike deckbuilder with daily challenges.
A special bot creates daily posts on Reddit, which list the features of today’s challenge.
When I want to check out the new challenge and don’t have access to the game, I have to open the game’s subreddit, find the necessary thread and open it.
It requires two clicks! Unacceptable, right?
This single-file Kotlin application periodically checks for new daily posts and, when requested, redirects to the newest one. That’s all. At least I practiced Kotlin a bit.
package com.httpain.spire

import org.eclipse.jetty.server.Request
import org.eclipse.jetty.server.Server
import org.eclipse.jetty.server.ServerConnector
import org.eclipse.jetty.server.handler.AbstractHandler
import org.eclipse.jetty.util.log.Log
import org.jsoup.Jsoup
import java.util.concurrent.Executors
import java.util.concurrent.TimeUnit
import javax.servlet.http.HttpServletRequest
import javax.servlet.http.HttpServletResponse


fun main(args: Array<String>) {
    val server = Server()
    val http = ServerConnector(server)

    http.host = "localhost"
    http.port = 8080
    // app does one redirect and nothing more, not worth keeping the connection
    http.idleTimeout = 0

    server.addConnector(http)
    server.handler = RedirectingHandler { LinkScraper.cachedLink }

    server.start()
    server.join()
}

class RedirectingHandler(val linkProvider: () -> String) : AbstractHandler() {
    override fun handle(
        target: String?, baseRequest: Request?,
        request: HttpServletRequest?, response: HttpServletResponse?
    ) {
        // re-evaluate linkProvider each time to get fresh link
        response!!.sendRedirect(linkProvider())
    }
}

object LinkScraper {
    private const val latestPostsPage = "https://www.reddit.com/user/StSDailyBot"
    private const val timeoutMillis = 30 * 1000
    private const val periodMinutes = 15L

    private val log = Log.getLogger(LinkScraper.javaClass)
    private val executor = Executors.newSingleThreadScheduledExecutor()

    @Volatile
    var cachedLink: String
        private set

    init {
        cachedLink = getLink()
        executor.scheduleWithFixedDelay(
                {
                    try {
                        cachedLink = getLink()
                        log.info("Link to newest post: $cachedLink")
                    } catch (e: Exception) {
                        log.warn(e)
                    }
                },
                periodMinutes, periodMinutes, TimeUnit.MINUTES
        )
    }

    private fun getLink(): String {
        val document = Jsoup.connect(latestPostsPage).timeout(timeoutMillis).get()
        // class names are generated/obfuscated, attribute presence is more reliable
        return document.select("""a[data-click-id="body"]""")
                // absUrl converts links to absolute
                .map { element -> element.absUrl("href") }
                .first { href -> href.contains("daily_run") }
    }

}
And here’s a sample build.gradle with fat jar support, which was enough to deploy it wherever I wanted:
plugins {
    id 'org.jetbrains.kotlin.jvm' version '1.2.70'
}

group 'com.httpain'
version '1.0-SNAPSHOT'

repositories {
    mavenCentral()
}

jar {
    manifest {
        attributes "Main-Class": 'com.httpain.spire.ApplicationKt'
    }
    from {
        configurations.compile.collect { it.isDirectory() ? it : zipTree(it) }
    }
}

dependencies {
    compile 'org.jetbrains.kotlin:kotlin-stdlib-jdk8'
    compile 'org.eclipse.jetty:jetty-server:9.4.12.v20180830' // to handle HTTP requests
    compile 'org.jsoup:jsoup:1.11.3' // to parse Reddit HTML
}

compileKotlin {
    kotlinOptions.jvmTarget = "1.8"
}
compileTestKotlin {
    kotlinOptions.jvmTarget = "1.8"
}
Once upon a time I was feeling adventurous and offered a fellow developer to migrate his website from a bunch of
hand-written HTML pages to Jekyll.
He’s a Windows user, so I had to make sure that writing, previewing and building will work there with minimal effort.
I encountered a couple of problems during the process, so I decided to document it step by step for future reference.
Install Ruby + Devkit
RubyInstaller is a project that makes working with Ruby on Windows less painful.
For this post I used Ruby+Devkit 2.4.4-2 (x64) — the recommended version which was highlighted in bold on the page.
The GUI part of the installation is pretty straightforward, all parameters set to default values. After that, a
command-line installer appears.
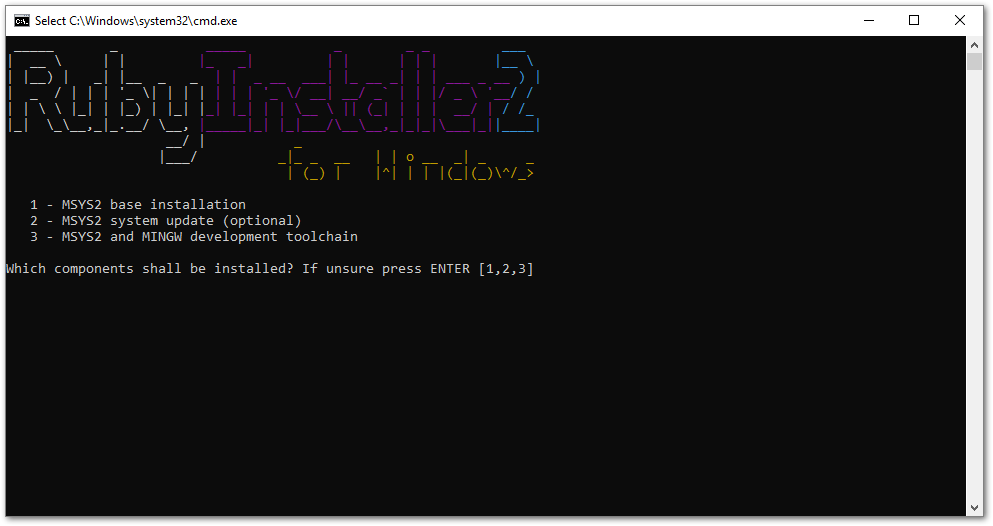
Here I had some trouble: it looked like 1,2,3 is a preselected option, but simply pressing ENTER didn’t do anything.
I had to manually type 1,2,3 and then press ENTER.
(If you wonder what these three options mean, I found this answer pretty
clear)
The process takes some time and finishes with a similar screen, but the preselected option is now empty because all
three components are already installed:
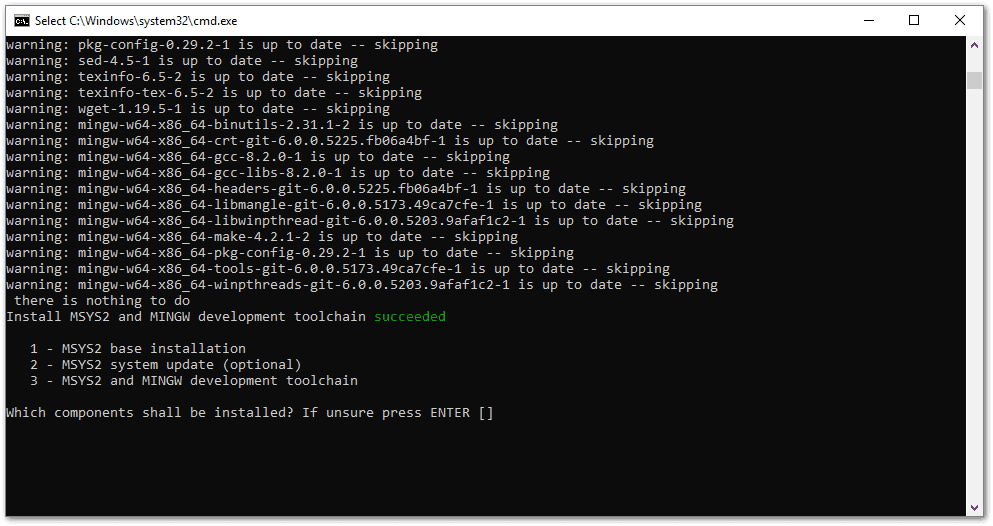
One more trouble here — I had to press ENTER two or three times for the window to go away.
Install Jekyll
For the remaining steps I used Git bash, but Windows command prompt is also fine.
First, let’s check that Ruby is working.
$ ruby -v
ruby 2.4.4p296 (2018-03-28 revision 63013) [x64-mingw32]
Install gems as written in official Jekyll on Windows guide. For some
reason I had no console output when the operation was in progress, it all appeared at the end — so don’t worry if you
don’t see anything for a couple of minutes.
Note that some lines from the output are omitted and replaced with ...
$ gem install jekyll bundler
Successfully installed public_suffix-3.0.3
Successfully installed addressable-2.5.2
...
Done installing documentation for bundler after 11 seconds
26 gems installed
No errors so far. Let’s create a new Jekyll project called foo:
$ jekyll new foo
Running bundle install in C:/Users/User/foo...
  Bundler: Fetching gem metadata from https://rubygems.org/............
  Bundler: Fetching gem metadata from https://rubygems.org/..
  Bundler: Resolving dependencies...
  ...
  Bundler: Bundle complete! 5 Gemfile dependencies, 33 gems now installed.
  Bundler: Use `bundle info [gemname]` to see where a bundled gem is installed.
New jekyll site installed in C:/Users/User/foo.
Also no errors. However, there is one more important step…
Fix LiveReload
I’ve read about some LiveReload problems on Windows before, but this one caught me off guard:
$ cd foo

$ jekyll serve --livereload
Configuration file: C:/Users/User/foo/_config.yml
            Source: C:/Users/User/foo
       Destination: C:/Users/User/foo/_site
 Incremental build: disabled. Enable with --incremental
      Generating...
       Jekyll Feed: Generating feed for posts
                    done in 0.49 seconds.
 Auto-regeneration: enabled for 'C:/Users/User/foo'
Unable to load the EventMachine C extension; To use the pure-ruby reactor, require 'em/pure_ruby'
C:/Ruby24-x64/lib/ruby/gems/2.4.0/gems/eventmachine-1.2.7-x64-mingw32/lib/rubyeventmachine.rb:2:in `require': cannot load such file -- 2.4/rubyeventmachine (LoadError)
...
A quick Google search revealed that eventmachine gem can be
reinstalled with --platform=ruby.
Doesn’t sound like rocket science. Let’s try it:
$ gem uninstall eventmachine
ERROR:  While executing gem ... (Gem::DependencyRemovalException)
    Uninstallation aborted due to dependent gem(s)
Come on, I simply want to reinstall one gem! Java dependency management spoiled me too much. But wait, they should have
that one parameter…
$ gem uninstall eventmachine --force
Successfully uninstalled eventmachine-1.2.7-x64-mingw32
Now better install the good version before anyone notices.
$ gem install eventmachine --platform ruby
Temporarily enhancing PATH for MSYS/MINGW...
Building native extensions.  This could take a while...
Successfully installed eventmachine-1.2.7
Parsing documentation for eventmachine-1.2.7
Installing ri documentation for eventmachine-1.2.7
Done installing documentation for eventmachine after 5 seconds
1 gem installed
And the final attempt:
$ jekyll serve --livereload
Configuration file: C:/Users/User/foo/_config.yml
            Source: C:/Users/User/foo
       Destination: C:/Users/User/foo/_site
 Incremental build: disabled. Enable with --incremental
      Generating...
       Jekyll Feed: Generating feed for posts
                    done in 0.371 seconds.
 Auto-regeneration: enabled for 'C:/Users/User/foo'
LiveReload address: http://127.0.0.1:35729
    Server address: http://127.0.0.1:4000/
  Server running... press ctrl-c to stop.
Now the website owner can proudly update and rebuild everything on his own, enjoying Jekyll developer features even on
Windows.
Update from 2020: I’ve got an email from a reader (thanks Jacob!) that LiveReload doesn’t work if there is no
<head> tag in the document, so this also may be helpful for
someone. Relevant GitHub discussion
If an old unit test suddenly fails on your machine and you forget to do something about it, it can be a long time before
you meet again.
Probably the name of the test contains exciting words like Concurrent, Sleep or Async. Probably the author of the
code resigned a couple of years ago. Anyway, you want to be sure that this test won’t fail again at the worst possible
time.
I’ll show a couple of IntelliJ IDEA features which usually help me to catch and fix this.
Retry test until failure
I couldn’t think of a good made-up example, so let’s just write a crappy test which fails in about 5% of cases:
package com.example;

import org.junit.Test;
import java.util.concurrent.ThreadLocalRandom;
import static org.junit.Assert.assertTrue;

public class UnstableTest {
    @Test
    public void willFailOccasionally() {
        double value = ThreadLocalRandom.current().nextDouble();
        assertTrue(value > 0.05);
    }
}
If we run it once, there’s a good chance that it will pass.
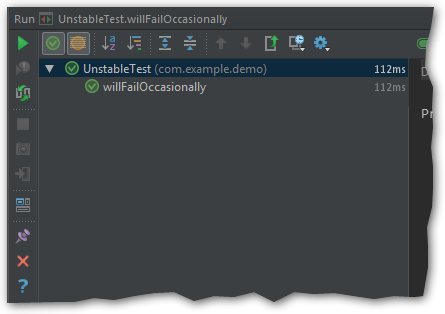
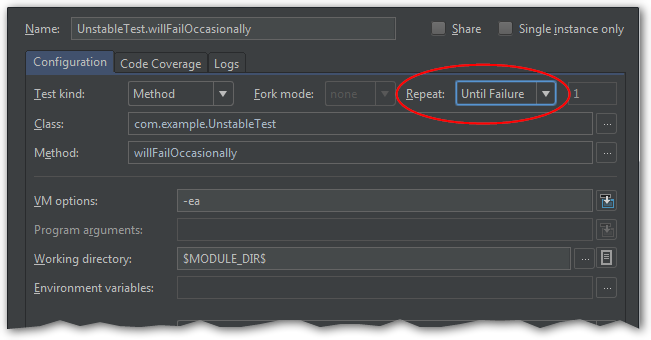
Let’s edit a Run Configuration for this test (Alt+Shift+F10).
Set “Repeat” to “Until Failure”:
Launch the test again.
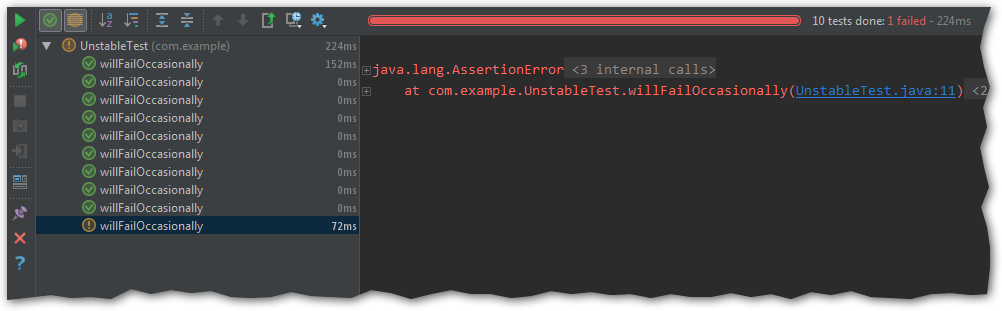
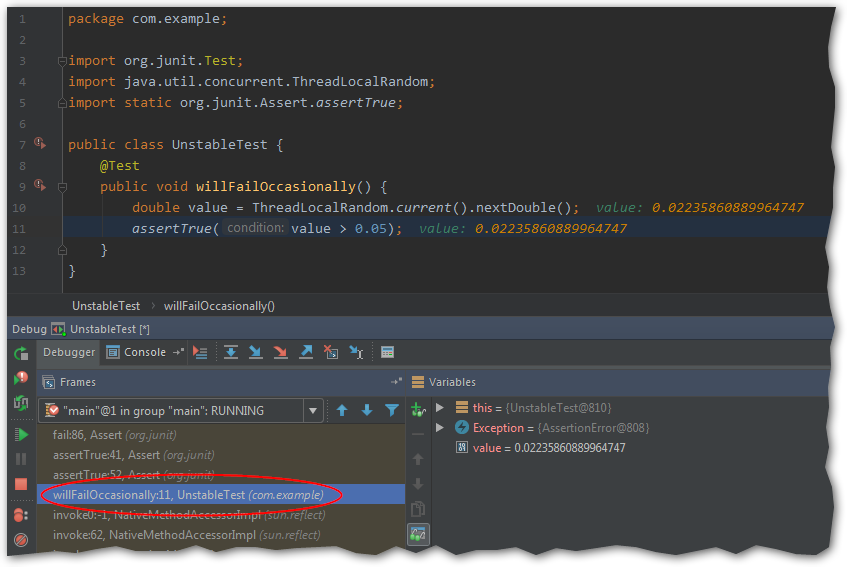
Now we have a proof that the test really fails. We can also inspect the data during the failing iteration if necessary.
Set breakpoint on specific exception
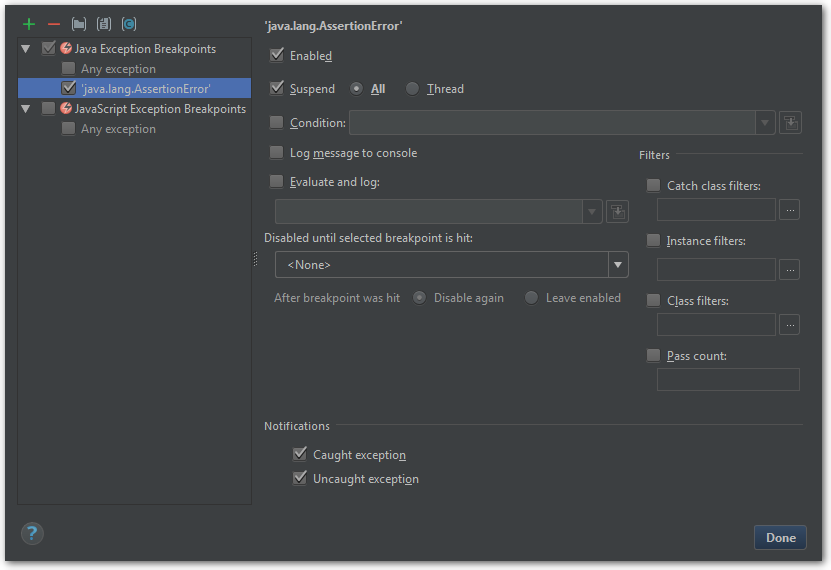
Open the Breakpoints window (Ctrl+Shift+F8) and add new Java Exception Breakpoint. According to the previous
screenshot, we need a breakpoint on AssertionError. No additional settings are necessary, just make sure that our
custom breakpoint is checked on the left panel.
After this, running the test in debug mode will make it stop on the exception. Now we can jump to any stack frame and
inspect the data.